How to Use a Huepar Laser Level for Accurate Home Renovations

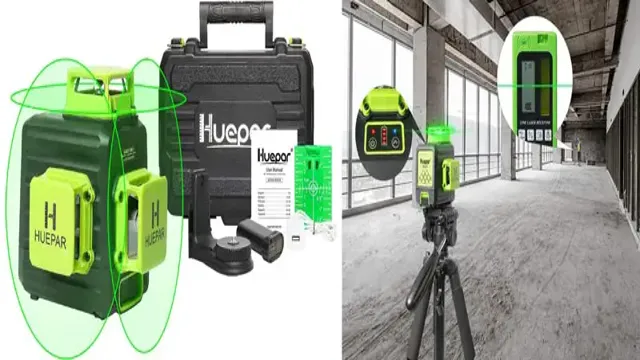
Have you ever found yourself struggling to align your pictures or shelves or create straight lines around the house? Fret not, as you might want to consider investing in a Huepar Laser Level. This tool makes it incredibly easy to get your DIY projects done precisely and quickly. With its advanced technology and versatility, you can create straight, level, and accurate lines in seconds! But how do you use it? In this blog post, we’ll walk you through the basics of how to use a Huepar Laser Level like a pro.
Whether you’re a DIY enthusiast or a professional contractor, we’ve got you covered. So, get ready to take your home improvement and renovation projects to the next level!
Step 1: Check the Level’s Battery
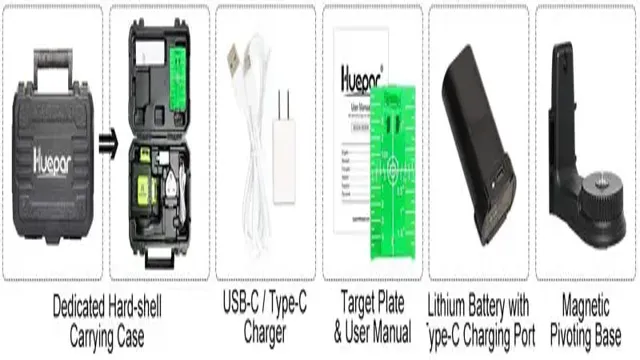
If you’ve just purchased a Huepar laser level and are excited to put it to use, the first step is to check the level’s battery. Before using the level, you want to make sure that the battery has enough charge and is ready to go. To do this, simply locate the battery compartment and remove the cover.
Insert the required batteries and replace the cover. Then, turn on the device to ensure that everything is working properly. If the battery is low, you may need to charge it or replace it.
With a fully charged battery, you can proceed with your project confident that your Huepar laser level will function correctly. Remember, checking the battery is a simple but important first step towards a successful use of your level.
Make sure the battery is charged or replace it with a new one.
When it comes to using a level, the first step is to ensure that the battery is charged or replace it with a new one. Without proper battery power, you won’t be able to rely on your level to provide accurate measurements. To check the battery level, look for a battery icon on the display screen.
If the icon is low or flashing, it’s time to replace the battery. Alternatively, you can use a voltmeter to check the battery’s voltage level. If it’s below the recommended level, swap it out for a new one.
Remember to choose a battery that’s compatible with your level’s make and model for optimal performance. Without a charged or functional battery, your level won’t give accurate readings, and you’ll be struggling to make sure everything is level. So be sure to check the battery level before using your level.

Step 2: Choose a Location
When it comes to using a Huepar laser level, choosing the right location is just as important as the tool itself. Before you start, take some time to survey the area you plan to work in. Look for any potential obstacles or hazards that could interfere with your measurements, such as uneven flooring, hanging fixtures, or high traffic areas.
It’s also important to consider the lighting conditions. A brightly lit room or outdoor area might be ideal, but if the light is too intense, it could affect the accuracy of your laser level. Additionally, you’ll want to choose a location where you can easily maneuver around the space without disrupting your measurements.
With all these factors in mind, you’ll be able to confidently choose the best location to maximize the effectiveness of your Huepar laser level.
Select a flat and stable surface to set up the level.
When it comes to setting up your level, choosing the right location is essential. You want to make sure that you select a flat and stable surface that will provide accurate readings. Whether you’re working on a DIY project at home or on a construction site, finding an appropriate location is critical.
Without a level surface, your measurements may be off, resulting in costly mistakes and inaccurate results. So, take the time to assess the area where you plan to work. Look for a spot that is free of bumps and debris, and that won’t shift or move while you work.
Once you’ve found the perfect location, you can proceed with confidence, knowing that your level will provide precise readings every time. Remember, taking the time to set up your level correctly at the beginning will save you time, money, and frustration in the long run.
Step 3: Set up the Level
Now that you have set up your Huepar laser level, it’s time to set up the level itself. To do this, you’ll need to place the level on a sturdy surface, making sure it’s level before turning it on. Once it’s powered on, you can adjust the level using the adjustable feet on the bottom of the level.
Most Huepar laser levels come with a pendulum lock to secure the level during transportation or to protect the pendulum during storage, so make sure to unlock it before using the level. Once the level is set up and adjusted, you can use it to align items horizontally or vertically, and even at angles. So, whether you’re a DIY enthusiast or a professional contractor, learning how to use a Huepar laser level can save you time and make your projects look more professional.
Attach the level onto the tripod or mount it on a wall.
To successfully set up your level, you’ll need to attach it to a tripod or mount it on a wall. This step is crucial as it ensures that your level stays in place and maintains accuracy throughout the leveling process. If you’re using a tripod, make sure that it’s sturdy and can support the weight of your level.
Most tripods have a screw in the center, which you’ll screw the level onto. Once securely attached, you can adjust the height and angle of the level until it’s level. Alternatively, you can mount the level onto a wall using screws or nails.
This option is ideal if you’re doing long-term leveling in a specific area. Whichever option you choose, it’s important to make sure that your level is secure and won’t move around. This will ensure that your leveling project is accurate and successful.
Remember to take your time and do it right the first time.
Step 4: Turn on the Level
One of the most important steps in using a Huepar laser level is turning it on. Before turning on the level, make sure that it is securely attached to the surface where you want to use it. Once it is secured, turn the level on by pressing and holding the power button.
The power button is usually located on the side or top of the device. When the level turns on, you will hear a beep or see a light indicating that it is ready for use. At this point, it is important to wait for the level to self-level before making any adjustments.
This process can take a few seconds to a few minutes, depending on the device and the surface it is attached to. Once the level is self-leveled, you can begin using it to measure and mark the desired surface. By following these steps, you can effectively and efficiently use your Huepar laser level for all of your measurement needs.
Press the power button and select the mode (horizontal or vertical).
When it comes to using a level, the next step after attaching it to whatever surface you need to level is to turn it on. To do this, locate the power button on your level and press it. Once the level is turned on, you will need to select which mode you want to use – horizontal or vertical.
This will depend on what you’re leveling. If you’re leveling a picture on a wall, you’ll want to use the horizontal mode. If you’re leveling something like a shelf or a piece of furniture, you’ll most likely want to use the vertical mode.
The mode selection is usually made through a button on the level or through the interface on an electronic level. Once you’ve selected your mode, you’re ready to start using the level and making sure everything is straight and even. By following these simple steps, you’ll be able to effectively use a level in all your DIY projects or small repairs with ease.
Step 5: Adjust the Level
One important step in learning how to use a Huepar laser level is to adjust the level. Once you have set up the level and turned it on, it is important to make sure that it is level before continuing your project. This can be done by adjusting the screws or knobs on the level until the bubble is centered between the two level lines.
It is important to adjust the laser level on a surface that is already level, such as a table or bench. If the surface is not level, it can throw off the reading and make it difficult to get an accurate reading. Once the level has been properly adjusted, you can continue using it for your project with confidence.
Use the leveling screws or the tripod’s adjustable legs to adjust the level’s accuracy.
After setting up the level on the tripod, it’s essential to ensure its accuracy. Using the leveling screws or the tripod’s adjustable legs, you can adjust the level to your desired accuracy. It’s important to ensure that the bubble in the level is in the center, indicating a horizontal direction.
Adjustments can typically be made by turning the screws or legs clockwise or counterclockwise until the bubble is in the center. Once you have achieved the desired accuracy, you can lock the adjustments in place before beginning your work. Keep in mind that having a level that is not properly adjusted can lead to inaccurate measurements, which can ultimately impact the outcome of your project.
So, take your time, adjust the level carefully, and ensure its accuracy before beginning your work.
Step 6: Check the Level’s Accuracy
One of the most crucial steps in using a Huepar laser level is to check the accuracy of the level. After setting up your laser level on a tripod or a stable surface, it is recommended to check the horizontal and vertical lines using a spirit level or a bubble level. It is important to ensure that both the laser level and spirit level are in the same position and orientation, and then check if the bubble in the spirit level is centered.
If the bubble is not centered, adjust the laser level until the bubble is centered. By checking the accuracy of your laser level, you can have confidence in the precision of your measurements and ensure that your project is completed with accuracy and consistency. Remember, taking a few extra minutes to check the accuracy of your laser level can save you time and money in the long run.
Use a bubble level or a benchmark to ensure the level is accurate.
When it comes to ensuring your level is accurate, it’s always best to double-check. One of the most reliable ways to do this is by using a bubble level or benchmark in your checking steps. A bubble level is a simple tool that uses the principle of gravity.
When the level is placed on a horizontal surface, the bubble in the middle must sit perfectly in between the two lines for it to be considered a leveled. In contrast, the benchmark is a standardized level with a lifespan of up to 50 years or more which is used to check the accuracy of other levels. To use, place your level on the benchmark’s surface, and then adjust it until you get a consistent level.
Once you’ve compared your level with the bubble or benchmark, if it’s spot-on, you’re good to go, and you can start using it with confidence accurately. However, if it’s off, you’ll have to recalibrate, which you can do by adjusting the screws and repeating the checking step until it sits in the perfect level. By ensuring your level is accurate, your DIY projects will all be level-headed!.
Step 7: Use the Level
Now that you’ve set up your Huepar laser level, it’s time to put it to use! The first step is to make sure your device is level. Use the built-in bubble vials to ensure that the housing is sitting evenly on the surface. Once you’re confident that it’s level, turn the device on and adjust the brightness and pulse modes as needed for your environment.
Now you’re ready to start your project! Whether you’re hanging shelves, installing tile, or laying out a landscaping project, the Huepar laser level is an indispensable tool. Simply position the device where you need to start, and let it project a level line across your work area. Use this line as a guide to ensure that everything you do is straight and even.
Make sure to take breaks periodically to check that the level hasn’t shifted, as this can mess up your entire project. With a little patience and practice, you’ll soon be able to complete all sorts of projects with ease using your trusty Huepar laser level!
Turn on the laser and use it for alignment, leveling, or other tasks.
Now that your laser level is installed and ready to go, it’s time to put it to use! Turning on the laser is simple, just locate the power button and give it a press. Once it’s on, you can use it to help with alignment, leveling, or other precision tasks. The laser emits a straight beam of light that can help you accurately locate and place objects, making your work much easier and efficient.
The best part about using a laser level is that it’s incredibly easy to use. All you have to do is point it in the direction you want the laser to shine and adjust its position until it’s perfectly aligned. Whether you’re working on a construction project or simply hanging pictures in your home, a laser level is an essential tool that can save you time and effort.
So, turn it on, and let the laser guide your way to perfection!
Conclusion
In conclusion, using a Huepar laser level is a piece of cake! Just turn it on, adjust the height, and watch as it projects a perfectly level line onto any surface. Whether you’re hanging pictures, laying tile, or even building a new home, this nifty tool will be your new best friend. So forget about the stress and hassle of manual leveling methods and join the laser level revolution with Huepar!”
FAQs
What is a Huepar laser level, and how does it work?
A Huepar laser level is a device used to project a level line or crosshairs onto a surface. It works by emitting a laser beam that is accurate and highly visible.
Can the Huepar laser level be used for outdoor projects?
Yes, the Huepar laser level is designed to work both indoors and outdoors, and it has a working range of up to 50 feet outdoors and 115 feet indoors.
How do I set up the Huepar laser level?
Setting up the Huepar laser level is easy. Simply turn it on, position it where you need it, and adjust it so that the beam is projecting where you need it.
Can the Huepar laser level be mounted on a tripod?
Yes, the Huepar laser level is designed to be compatible with a tripod. This allows you to position it at the ideal height for your project.
What types of projects is the Huepar laser level useful for?
The Huepar laser level is useful for a variety of projects, including hanging shelves, wallpapering, laying tile, and installing cabinets and fixtures.
How accurate is the Huepar laser level?
The Huepar laser level is very accurate, typically accurate within 1/16 inch per 33 feet. This makes it highly reliable for projects that require precision.
What is the battery life of the Huepar laser level?
The battery life of the Huepar laser level depends on the model, but most have a battery life of around 20 hours. It also has a low battery indicator to let you know when it’s time to replace the batteries.


