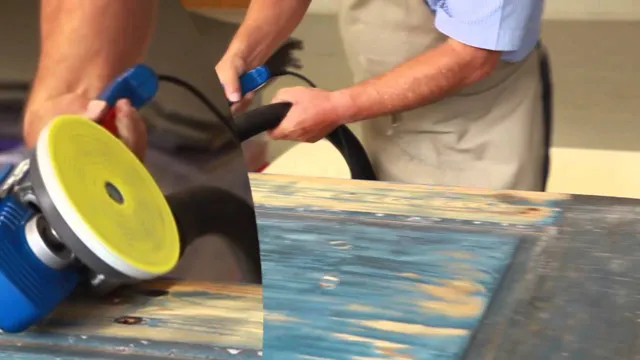
Are you tired of tired of sanding wood by hand? Are you looking for a faster and more efficient way of finishing your wooden projects? Look no further than your trusty angle grinder! With the right attachments and techniques, an angle grinder can be a game changer when it comes to sanding wood. Sanding wood with an angle grinder may seem intimidating at first, but with the proper guidance, it can become a simple and effective process. In this complete guide, we will cover everything you need to know about using an angle grinder to sand wood.
We’ll start by discussing the different attachments and discs that can be used for sanding, and how to choose the right one for your project. We’ll also cover safety measures that need to be taken, such as wearing protective gear and securing your work piece. Next, we’ll dive into the techniques for sanding wood with an angle grinder, including how to create smooth finishes and how to avoid creating unwanted grooves and scratches.
We’ll also cover how to sand hard-to-reach areas and curved surfaces. Finally, we’ll provide tips for maintaining your angle grinder and keeping it in top shape for future projects. By the end of this guide, you’ll have the knowledge and confidence to sand wood with an angle grinder and take your woodworking to the next level.
Introduction
If you’re looking to sand wood quickly and efficiently, using an angle grinder can be a great option. However, it’s important to use the right techniques and safety precautions to ensure a smooth finish without damaging the material or injuring yourself. Firstly, make sure you have the correct grinding wheel attachment for wood.
It should be a disc that is rough but not too abrasive. Next, secure the wood to a stable work surface and make sure you’re wearing appropriate safety gear, including eye and ear protection. Use the angle grinder in a smooth and controlled manner, moving it back and forth over the surface of the wood in a parallel motion.
Avoid staying in one spot for too long to prevent overheating and maintain an even finish. With the right technique and safety measures, using an angle grinder to sand wood can be a time-saving and effective option for any DIY project.
What is an Angle Grinder?
An angle grinder is a power tool that is commonly used in construction and metalworking industries. It is a handheld device with a rotating disc or wheel that can be used for a variety of tasks, including cutting, grinding, and sanding. The disc or wheel can be swapped out for different types depending on the task at hand.
Angle grinders are powerful tools that can be dangerous if not used properly, so it is important to have the right training and safety gear before operating one. With the right precautions, an angle grinder can be an incredibly useful and versatile tool for any DIY project or professional job.

Why Use an Angle Grinder for Sanding Wood?
Angle Grinder, Sanding Wood Introduction: If you are into woodworking, you might want to know the tools that can make your job easier and faster. An angle grinder can be a handy tool in your arsenal to sand wood. Yes, you read that right! Using an angle grinder for sanding wood might sound unusual, but it has gained popularity in recent years, especially among carpenters and DIY enthusiasts.
Angle grinders are versatile tools that can perform various tasks, including sanding, polishing, and grinding. Sanding wood with an angle grinder can save you time and effort, providing better results than traditional sanding methods. Let’s discover why an angle grinder is an effective tool for sanding wood and how it can help you get the job done quickly with professional results.
Selecting the Right Discs for Sanding Wood
When it comes to sanding wood with an angle grinder, selecting the right discs is crucial. The type of disc you use will depend on the task at hand, as well as the type of wood you are working with. For rough sanding, a coarse grit disc is ideal, whereas a fine grit disc is better for finishing and smoothing out rough edges.
It’s also important to consider the material of the disc itself – for example, ceramic discs are great for grinding and shaping, whereas zirconia discs are better for finishing. Don’t forget to always wear protective gear when working with an angle grinder, and always adhere to safety guidelines. With the right discs and proper safety measures, sanding wood with an angle grinder can be an effective and efficient way to achieve a smooth and even finish.
Grit Size
When sanding wood, selecting the right discs is crucial to achieving the desired result. One important factor to consider is the grit size. Grit size refers to the number of abrasive particles per square inch of sandpaper.
The larger the number, the finer the grit and the smoother the finish. For instance, lower grit sizes like 40 or 60 are ideal for heavy sanding, while higher grit sizes such as 120 or 220 are better suited for fine sanding or finishing. It’s important to note that different types of wood require different grit sizes.
For example, softwoods like pine need a finer grit size compared to hardwoods like oak. Keeping these factors in mind, you can select the right grit size for your wood sanding project.
Disc Material
When it comes to sanding wood, selecting the appropriate disc material is crucial. The type of material used can determine the outcome of your project. There are various types of disc materials to choose from, including aluminum oxide, ceramic, and zirconia.
Aluminum oxide discs are best for sanding softwoods and have a longer lifespan. Ceramic discs are ideal for sanding hardwoods and can remove material at a faster rate. Zirconia discs are suitable for heavy-duty sanding and can sand wood with ease.
Each disc material has its strengths and weaknesses, so it’s essential to choose the right one according to your project’s requirements. By selecting the appropriate disc material, you’ll get the desired result and save time and effort in the process.
Preparing the Wood Surface for Sanding
When preparing wood surfaces for sanding with an angle grinder, it’s important to make sure the wood is clean and dry. Remove any old finish or paint using a scraper or chemical stripper, and then use a vacuum or brush to remove any dust or debris. Once the surface is clean, use a coarse grit sandpaper to rough up the surface and remove any remaining finish or paint residue.
Then, switch to a finer grit sandpaper to smooth out the wood and prep it for finishing. Always wear protective gear, such as eye and ear protection, and make sure the angle grinder is securely fastened before starting. With these steps, you can successfully sand wood with an angle grinder and achieve a smooth, even surface for your next woodworking project.
Cleaning the Wood Surface
Before sanding your wood surface, it’s essential to clean it properly to remove any dirt, grime, or stains that may have accumulated over time. Start by sweeping the surface with a soft-bristled brush to remove any loose debris. Next, use a damp cloth to wipe down the surface, removing any stubborn dirt or stains.
Be careful not to oversaturate the wood as excessive moisture can cause warping and damage. For tough stains, you may need to use a specialized wood cleaner or sandpaper to scrub them out. Once the wood is clean, allow it to dry completely before moving on to sanding.
A clean surface is crucial as any remaining dirt or stains can get ground into the wood during sanding, leading to an uneven final result. By properly cleaning the surface before sanding, you’ll ensure a smooth, even finish that looks great.
Securing the Wood Surface
Before sanding the wood surface, it is crucial to prepare it properly to ensure a smooth and secure finish. One of the essential steps in preparing the wood surface is to seal any cracks or holes with wood filler and let it dry completely. Once the filler dries, use sandpaper to sand the surface gently, removing any rough edges or raised grain, and creating a smooth surface.
If the wood has a stubborn stain or a layer of paint, it might need extra sanding or a chemical stripper to remove it completely. Once the wood is free of any unwanted stains or old finish, take a damp cloth and wipe the surface clean, removing any remaining dust and debris. Properly preparing the wood surface helps in achieving a high-quality finish and extends the life of the wood.
Sanding the Wood Surface with an Angle Grinder
If you’re looking for a quick and efficient way to sand your wooden surfaces, using an angle grinder can be a great option. However, it can be a bit daunting to get started, especially if you’ve never used an angle grinder before. Firstly, it’s essential to choose the right type of sanding disc for the job.
Typically, flap discs are the most suitable for wood surfaces as they can remove material quickly and efficiently. Once you’ve chosen your sanding disc, attach it to the angle grinder and adjust the speed to a lower setting to prevent damaging the wood. Always make sure to wear proper safety gear such as goggles and a dust mask as the process can be quite dusty.
Move the grinder in straight lines along the grain of the wood, working in small areas at a time. Be careful not to apply too much pressure, as this can cause grooves and unevenness in the surface. Remember to keep moving the grinder and never stay in one spot for too long.
With a little bit of practice, sanding your wooden surfaces with an angle grinder can be an easy and efficient task.
Step-by-Step Instructions
Sanding wood surfaces with an angle grinder is an important step in the woodworking process. It helps to smooth out rough or uneven surfaces and prepares the wood for staining or painting. To get started, you’ll need to choose the right sanding disc for your grinder.
A larger grit disc will remove more material, while a finer grit disc will provide a smoother finish. Once you have your disc attached, turn on the grinder and begin sanding in a back-and-forth motion along the grain of the wood. Be sure to keep the grinder moving at all times to avoid creating deep grooves.
Take breaks and check the surface often to ensure that you’re removing just enough material without going too far. When you’re done, use a vacuum or brush to remove any remaining dust or debris. With a little patience and practice, you’ll be able to sand your wooden surfaces to perfection with an angle grinder.
Tips for Safe and Effective Sanding
Sanding the wood surface with an angle grinder can be an effective way of achieving a smooth finish on your project. However, it’s important to take certain safety precautions before starting. Always wear protective gear such as gloves and goggles, and make sure you have a solid grip on the tool.
It’s also a good idea to work in a well-ventilated space to avoid inhaling dust and debris. When starting the angle grinder, let it reach its maximum speed before making contact with the wood. This will prevent the tool from biting into the surface and causing damage.
Once you start sanding, keep the tool moving in a back and forth motion, working in the direction of the grain. It’s important to use even pressure and avoid applying too much force as this can cause the grinder to bounce and create uneven marks on the wood. With practice and patience, you’ll be able to achieve a smooth and polished finish on your project.
Conclusion
In conclusion, sanding wood with an angle grinder is a highly effective and efficient way to tackle any woodworking project. With the right attachments and techniques, you can achieve a smooth and polished finish that is sure to impress. Just remember to follow proper safety precautions and take breaks as needed to avoid any mishaps.
So go ahead, grab that angle grinder with confidence and get ready to unleash your inner woodworking guru!”
FAQs
Can an angle grinder be used for sanding wood?
Yes, an angle grinder can be used for sanding wood with the appropriate sanding disc attachment.
What sanding disc should I use to sand wood with an angle grinder?
For sanding wood with an angle grinder, it’s best to use a flap disc or sanding disc with a coarse grit.
How do I attach the sanding disc to the angle grinder?
To attach the sanding disc to the angle grinder, first, make sure the grinder is unplugged. Then, remove the disc guard and lock the spindle. Finally, screw on the sanding disc in a clockwise direction.
What safety precautions should I take when sanding wood with an angle grinder?
It’s important to wear proper eye and ear protection, as well as a dust mask, when sanding wood with an angle grinder. It’s also essential to use both hands and maintain a stable stance while operating the grinder.
Can I use an angle grinder to sand hardwood floors?
While an angle grinder can be used to sand hardwood floors in small areas or for spot-sanding, it’s not recommended for large areas due to the potential for uneven sanding and damage to the floor.
Can an angle grinder be used to sand painted wood?
Yes, an angle grinder can be used to sand painted wood with a flap or sanding disc, but it’s important to use a fine or medium grit to avoid damaging the wood underneath the paint.
How do I maintain my sanding disc when using an angle grinder to sand wood?
To maintain your sanding disc, it’s important to clean it regularly to remove any buildup or debris that can damage the disc or cause it to wear out quickly. Use a wire brush or abrasive pad to clean the disc after each use and replace it when it becomes too worn to be effective.


