How to Change Pressure Switch on Air Compressor: A Step-by-Step Guide

Have you noticed your air compressor struggling to turn on or not turning off when it should? The culprit may be a faulty pressure switch. A pressure switch is an essential component of an air compressor as it controls the pressure levels and regulates the operation of the compressor. If you’re wondering how to change a pressure switch on an air compressor, then you’ve come to the right place! In this blog, we’ll guide you through the process step-by-step, making it easy and straightforward for you to replace your pressure switch with ease.
By the end of this article, you’ll feel confident to tackle this repair yourself and have your air compressor running efficiently again in no time. So, let’s dive in!
Overview
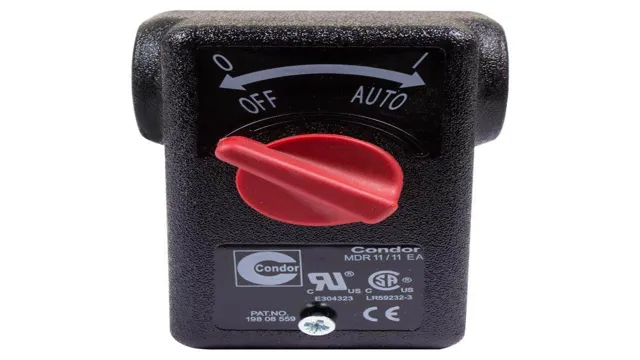
If you’re wondering how to change the pressure switch on your air compressor, you’ve come to the right place. First, you’ll need to locate your pressure switch. It’s typically a square box with wires coming out of it that is attached to the side of the compressor tank.
Next, make sure to turn off and unplug your compressor. You don’t want any accidents to happen while you’re working on it. Once you’ve done that, you can use a wrench to remove the existing pressure switch from the tank.
Make sure to take note of which wires are connected where so you can reconnect them properly later. Finally, connect the new pressure switch to the tank and reconnect the wires in their proper locations. Once you’ve done that, turn your compressor back on and test it to make sure it’s working properly.
Changing the pressure switch on your air compressor is a relatively simple process, but it’s important to take your time and pay attention to what you’re doing to avoid any accidents or mistakes.
Importance of Pressure Switch on Air Compressor
One of the most vital components in an air compressor is the pressure switch. This device plays a crucial role in ensuring that the compressor operates safely and efficiently. Essentially, the pressure switch monitors the pressure levels within the compressor tank and turns the motor on or off accordingly.
This prevents the compressor from running continuously and potentially overheating, which can result in damage to the device or even cause a safety hazard. It also protects the compressor from damage due to low pressure or leaks, which can be costly to repair. Essentially, the pressure switch acts as a failsafe mechanism that helps to prolong the life of the compressor and prevent any potential accidents or hazards.
Ensuring that the pressure switch is functioning correctly is important, and regular maintenance is recommended to keep it in good working order. Overall, the pressure switch plays a vital role in the safe and efficient operation of an air compressor, making it a crucial component to keep an eye on.

When to Replace a Pressure Switch
If you’re experiencing issues with your water system, such as low water pressure or consistent cycling of the pump, it may be time to replace your pressure switch. A pressure switch is responsible for monitoring and regulating the water pressure in your system. Over time, wear and tear can degrade the switch’s functionality, leading to inconsistent or incorrect readings.
This can result in damage to your system, wasted water, and higher energy bills. To determine if your pressure switch needs replacing, observe the behavior of your system and look for signs of wear and tear on the switch itself. If you notice any of these issues, it’s time to consider a replacement to keep your system functioning properly.
It’s always better to address these issues sooner rather than later to avoid more costly repairs.
Step-by-Step Guide
If you’re experiencing issues with your air compressor not turning on or off at the correct pressure, you may need to replace the pressure switch. Fortunately, this is a relatively simple task that can be done in just a few steps. First, make sure to disconnect the power source and drain the compressed air from the tank.
Next, locate the pressure switch and remove any covers or wires that may be blocking it. Use a wrench to remove the old pressure switch and replace it with a new one, being careful to match the correct wire connections. Finally, reattach any covers or wires and turn on the power source to test the new switch.
By following these steps, you can ensure that your air compressor is working correctly and efficiently.
Step 1: Disconnect the Air Compressor
When it comes to disconnecting your air compressor, taking proper precautions is essential. Starting with step one, you should turn off your compressor and unplug it from the power source. Next, remove any attached hoses or tools from the air compressor.
It’s important to make sure that there is no pressure left in the tank before disconnecting the compressor. To release any remaining pressure, turn the regulator knob counterclockwise until you hear a hissing sound. If there is still pressure after this step, you may need to bleed the air from the tank manually.
Once the pressure is safely released, you can disconnect the air compressor from its power source and move onto the next step. By following these simple steps, you’ll ensure that you stay safe and avoid any accidents while disconnecting your air compressor.
Step 2: Remove the Cover of the Pressure Switch
Now that you have located the pressure switch, it’s time to remove the cover. To do this, you’ll need a screwdriver. First, make sure the power is turned off, and then carefully unscrew the cover of the pressure switch.
Be sure to keep the screws in a safe place where they won’t get lost. Once you have removed the cover, you should be able to easily access the internal components of the pressure switch. It’s important to be careful when removing the cover, as you don’t want to accidentally damage any of the wires or other parts inside.
By following this simple step-by-step guide and proceeding with caution, you’ll be well on your way to successfully servicing your pressure switch.
Step 3: Disconnect the Wires from the Pressure Switch
Disconnecting the wires from the pressure switch is an essential step in troubleshooting pressure switch problems. To do this, make sure that you switch off the power supply to the device to avoid electric shock. Then, using a pair of pliers or a screwdriver, loosen the screws that are holding the wires in place.
Gently pull the wires out of the terminals and clip them aside, ensuring they do not touch each other. Take note of the wire colors so that you know which wires to connect to which terminals when reassembling the device. Some pressure switches have connectors, so instead of loosening screws, you can press down on the tabs or pull down on the release hooks to detach the connectors.
Whatever method you use, be gentle with the wires to avoid damaging them or the terminals. In conclusion, disconnecting the wires from the pressure switch is a simple and straightforward process that should be carried out with caution.
Step 4: Remove the Old Switch and Install the New One
Now that you have prepared all the necessary tools, it’s time to remove the old switch and install the new one. Make sure to turn off the power to the switch you’ll be replacing before you begin. To remove the old switch, unscrew the switch plate cover to access the switch.
Use your screwdriver to remove the screws holding the switch to the wall and gently pull the switch out. You should see three wires coming out of the wall – black, white, and green or bare copper. These are known as the live, neutral, and ground wires respectively.
Use your wire cutters to cut the wires connected to the old switch and strip off about half an inch of insulation from each wire. Now, it’s time to install the new switch. Attach the live wire to the black wire on the new switch, the neutral wire to the white wire, and the ground wire to the green or bare copper wire.
Screw the switch into place and secure it with the switch plate cover. Turn on the power supply and test the switch to ensure it’s working correctly. Congratulations, you successfully removed the old switch and installed the new one!
Step 5: Reconnect the Wires to the New Switch
Reconnecting the wires to the new switch is the final step in replacing a switch. Before you start, make sure the electricity is turned off at the circuit breaker. Next, use a voltage tester to double-check that no power is reaching the wires.
If it’s safe, remove the wire connectors or screws from the old switch, and carefully pull the wires out of the box without touching them. Then, attach the wires to the corresponding terminals on the new switch and use a screwdriver to secure them in place. Make sure the wires are connected correctly by double-checking the labeling on the switch and referring to the instructions provided by the manufacturer.
Once everything is connected, carefully tuck the wires back into the box and install the new switch cover. Finally, turn the circuit breaker back on and test the new switch to ensure it’s working correctly. Congratulations, you’ve successfully replaced your old switch with a new one!
Testing the New Pressure Switch
If you’ve noticed that your air compressor isn’t working the way it should, it may be time to change the pressure switch. Luckily, changing the pressure switch on an air compressor is a relatively simple task that can be done in just a few steps. The first thing you need to do is turn off the power to the compressor and release any air that may be in the system.
Once you’ve done that, you can remove the old pressure switch and replace it with the new one. Make sure to follow the manufacturer’s instructions carefully and tighten all connections securely. Once you’ve installed the new pressure switch, you can test it to make sure it’s working properly.
Simply turn on the power and run the compressor to see if the pressure switch is triggering the motor to turn on and off at the appropriate pressure levels. With a little bit of know-how and some careful attention to detail, you can easily change the pressure switch on your air compressor and get it back to working like new.
Step 1: Turn on the Air Compressor
Before you can begin testing a new pressure switch on your air compressor, you must first turn on the compressor itself. This might seem like a no-brainer, but it’s an important step in the process! Once the compressor is turned on, it will begin to generate air pressure that can be regulated by the pressure switch. Once you have turned the compressor on, you can begin to adjust the pressure switch to the desired settings and test its accuracy.
It’s important to note that each compressor may be slightly different, so it’s always a good idea to read through the owner’s manual before attempting any maintenance or repairs. With a little bit of know-how, you’ll be on your way to properly testing your new pressure switch and ensuring that your air compressor is functioning at its best.
Step 2: Check for Proper Pressure Reading
When replacing a pressure switch, it’s important to ensure that the air compressor has a proper pressure reading. This step should not be overlooked as it is crucial for the efficient functioning of the air compressor. To test whether the new pressure switch is working properly, you will need to first set the cut-in and cut-out pressure levels to their correct values.
Once this is done, turn on the air compressor and monitor the pressure gauge. The pressure should start to rise steadily until it reaches the cut-out pressure level. At this point, the compressor should switch off automatically.
If the pressure fails to rise or goes beyond the cut-out level, it’s likely that the new pressure switch is faulty and needs to be replaced. This could be due to incorrect installation or even a faulty switch. It’s best to double-check everything before using the air compressor to avoid any accidents or damages.
Conclusion
In summary, replacing a pressure switch on an air compressor may seem like a daunting task, but with the right tools and a bit of know-how, it can be an easy fix. Remember to always shut off power to the compressor before beginning any repairs and to follow the manufacturer’s instructions carefully. And if you’re feeling overwhelmed, just take a deep breath and remember that under pressure is where diamonds are made!”
FAQs
What is a pressure switch on an air compressor?
A pressure switch is a device that controls the on/off function of the air compressor by monitoring the air pressure within the compressor tank.
How do I know if my air compressor pressure switch is defective?
If the compressor fails to turn on or off at the right pressure levels, or the switch shows signs of damage or wear, it may be time to replace it.
What tools do I need to replace a pressure switch on an air compressor?
You’ll need a pair of pliers, a screwdriver, and a wrench or socket set of the appropriate size for your particular compressor model.
Can I replace a pressure switch on an air compressor myself?
Yes, with a basic understanding of electrical wiring and the appropriate tools, it is possible to replace a pressure switch on your air compressor.
How do I disconnect the old pressure switch from my air compressor?
Turn off power to the compressor, disconnect the power supply wires from the switch terminals, and remove the mounting screws or bolts that secure the switch to the compressor housing.
How do I install the new pressure switch on my air compressor?
Connect the power wires to the switch terminals, secure the switch to the compressor housing, and adjust the pressure settings to match the specifications for your particular compressor model.
What are the benefits of maintaining a properly functioning pressure switch on my air compressor?
A functional pressure switch ensures that the compressor runs at optimal performance levels, reduces the risk of damage or wear to the compressor or accessories, and extends the lifespan of the unit.


