How to Use a Manual Car Battery Charger: Step-by-Step Guide for Beginners
Manual car battery chargers can be a lifesaver when it comes to reviving a dead car battery. Whether you’re stranded in a parking lot or just need to give your car a quick boost, understanding how to use a manual car battery charger is an essential skill for any driver. But if you’ve never used one before, the process might seem daunting and confusing.
How do you hook it up? What do all the different settings mean? Don’t worry – in this blog, we’ll break down everything you need to know to confidently use a manual car battery charger and get your car back on the road in no time.
Step 1: Safety Precautions
Before jumping into the process of using a manual car battery charger, it’s crucial to take some safety precautions to ensure we don’t harm ourselves or damage the vehicle. The first thing we need to do is to park the car in a safe and stable place, preferably on level ground. Next, we need to turn off the ignition and all electrical components, such as the radio and headlights.
Some chargers may require us to disconnect the battery terminals before charging, so we need to be cautious while doing so and wear gloves and safety goggles for added safety. Another important thing to keep in mind is to avoid smoking, using an open flame or creating sparks while handling the charger or the battery. Once we’ve taken all necessary precautions, we can move to the next step of the process.
Wear protective equipment and remove jewelry
When it comes to any kind of home improvement or DIY project, ensuring your own safety is the first and foremost priority. Before you start working with any kind of tool or equipment, be sure to wear protective gear, such as safety goggles, gloves, and a dust mask. These precautions can help protect you from any potential hazards or injuries that could arise during your project.
Additionally, it’s important to take off any jewelry, such as rings or bracelets, that could get caught on tools or machinery. Remember, taking a few simple safety precautions at the start of your project can go a long way in preventing accidents and injuries down the line. So, stay safe and make sure you have the right gear before you get to work!
Ensure the charger is off and disconnected from the battery
When it comes to working with a battery charger, the first step should always be safety precautions. One of the most important things to remember is to ensure that the charger is off and disconnected from the battery before beginning any work. This simple step may seem obvious, but it can be easily overlooked in the rush to get started.
It’s crucial to take the time to double-check that the charger is completely switched off and unplugged from the battery to avoid any potentially dangerous situations. Starting work with a charger that is still active can lead to electric shocks and other serious injuries. So, make sure to take that extra moment to prioritize your safety and the safety of those around you by double-checking that the charger is off and disconnected before starting any work.
Step 2: Choose the Right Charger
Now that you’ve connected your manual car battery charger to your battery, it’s time to choose the right charger settings. Not all chargers are created equal, so you’ll want to make sure you’re using the correct voltage and amperage settings for your particular battery. Consult your vehicle’s owner’s manual or the charger manual for guidance on the appropriate settings.
You’ll also want to take into account the battery’s state of charge and any other factors that may affect charging, such as temperature or age. Using the wrong charger settings could result in damage to your battery or even cause a dangerous situation, so it’s important to be meticulous when selecting the right charger. With the proper settings in place, you’re one step closer to having a fully charged battery and getting back on the road.
Check the voltage of the battery and select the appropriate charger
When it comes to choosing the right charger for your battery, one crucial step is to check the voltage of your battery. Different batteries require different voltages to charge efficiently, and choosing the wrong charger can result in damage to your battery. This is why it’s essential to select the appropriate charger before plugging in your battery.
The main keyword for this step is “Choose the Right Charger.” By doing so, you’ll ensure that your battery is charged quickly and efficiently, without causing any damage to its internal components. A good idea is to consult your battery’s manual and check the voltage requirement.
Once you know the voltage, you can choose a charger that’s compatible with your battery. This will save you a lot of hassle in the long run and ensure that your battery stays in good condition for longer. Remember, the right charger can make all the difference in extending the lifespan of your battery, so don’t skimp on this step.
Select the charging rate based on the battery capacity
When it comes to choosing the right charger for your battery, the charging rate is a crucial factor to consider. The charging rate, which is measured in amps, is the amount of electrical current that flows into the battery to charge it. It’s important to select a charger that is compatible with your battery’s capacity to ensure safe and efficient charging.
For example, if you have a battery with a capacity of 100 Ah, you should choose a charger with a charging rate of at least 10 amps. This means that the charging time will be around 10 hours if the battery is completely discharged. However, if you choose a charger with a lower charging rate, it will take longer to charge the battery, and if you choose a charger with a higher charging rate, it can cause damage to the battery.
It’s also important to note that different types of batteries have different optimal charging rates. For instance, lithium-ion batteries require a specific charging rate to maintain their lifespan and optimal performance. This is why it’s essential to select a charger that is compatible with your battery type to avoid any damage and prolong its lifespan.
In summary, selecting the right charger for your battery is essential, and you should always consider the battery capacity and type when choosing a charger. By selecting a charger with the right charging rate, you can ensure safe and efficient charging, prolong your battery’s lifespan, and avoid any damage.
Step 3: Connect the Charger to the Battery
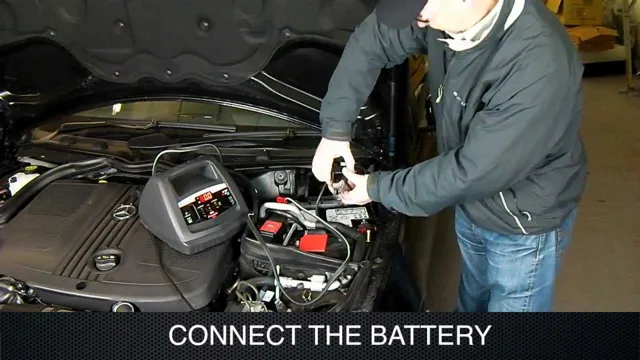
Now that you’ve prepared your battery and charger, it’s time to connect them. But before we begin, always ensure that the charger is unplugged from the power source. Look for the positive and negative terminals of the battery, which should be labeled with a plus and minus sign.
The charger has two identical cables that must be connected to the battery. Connect the red cable to the positive terminal and the black cable to the negative terminal. Be sure to tighten the clamps securely, making sure they don’t touch each other or any other metal component in the engine bay.
Once you have double-checked your connections, it’s time to plug in the charger. Turn on the charger and set the charging time according to the battery’s specifications. The charger will automatically adjust the charging process based on the battery’s needs.
Once the charger has completed its cycle, turn it off, unplug it, and remove the cables from the battery, starting with the negative terminal. Congratulations! You’ve successfully charged your car battery using a manual charger!
Connect the positive charger cable to the positive battery terminal
When it comes to charging your car battery, there are a few steps you need to follow to ensure you do it safely and properly. Once you’ve connected the charger to the power outlet, it’s time to move on to the next step: connecting the charger to the battery. This is where you need to exercise caution, as you don’t want to cause any damage to your car or yourself.
To connect the charger to the battery, start by identifying the positive and negative terminals. The positive terminal is usually marked with a “+” sign. Then, connect the positive charger cable to the positive battery terminal.
This should be a tight connection, so make sure you clamp it down securely. Once you’ve done this, move on to the negative cable. Again, make sure you’ve identified the negative terminal (marked with a “-” sign) before connecting the cable.
Secure the cable tightly to the negative terminal. Keep in mind that it’s important to connect the cables in the right order to avoid any electrical sparks or damage. By following this step, you’re one step closer to a fully charged battery!
Connect the negative charger cable to the negative battery terminal
Now that you have positioned your charger and located the terminals, it is time to connect it to your battery. The third step in the process is to connect the negative charger cable to the negative battery terminal. But before you do that, make sure you have turned off the charger to prevent any sparks.
Once that is done, it is important to ensure that the cable clamps are firmly attached to the battery terminals. This will help the charger produce an efficient and safe charge. The negative terminal is usually marked with a “-“ sign and colored black.
Once you have identified it, connect the negative charger cable to it. Remember to use gloves and safety glasses to avoid any accidents or mishaps. Connecting the charger to your battery correctly is crucial for optimal performance and longevity.
Step 4: Start the Charger
Now it’s time to start the charger! Before you do, make sure the charger is switched off and the cable is not plugged into the electrical outlet or the battery just yet. Double-check that the charger’s voltage and amperage settings match the requirements of your car battery. Next, connect the red positive clamp to the positive terminal of the battery.
The positive terminal will have a “+” symbol, and the clamp is usually colored red. Be careful not to let the clamp touch anything else besides the terminal. Then, connect the black negative clamp to the negative terminal of the battery.
The negative terminal will have a “-” symbol, and the clamp is usually colored black. Again, be careful to avoid contact with other metal parts. Once all the clamps are correctly attached, plug the charger’s cable into an electrical outlet and switch on the charger.
You should see the charger’s ammeter display a charging current. Now you’re ready to sit back and let the charger do its job.
Set the charging rate and turn on the charger
Now that you’ve plugged in your EV and it’s time to start charging, it’s important to set the charging rate and turn on the charger. Typically, your EVSE (Electric Vehicle Service Equipment) will allow you to select the charging rate, which can range from a few kilowatts to over ten kilowatts. It’s important to note that charging at a higher rate can result in a faster charging time, but may also be limited by the capacity of your vehicle’s battery and the charging infrastructure.
Once you’ve selected the desired charging rate, simply turn on the charger and wait for the magic to happen! It’s important to keep an eye on the charging progress and make sure that everything is operating smoothly. In most cases, your EV will display the charging progress on the dashboard, letting you know the estimated time remaining and the level of charge achieved. Remember, charging your EV is a process that requires patience and attention to detail, but once you’ve got the hang of it, you’ll be able to enjoy the benefits of emissions-free driving and a greener lifestyle.
So, settle into the driver’s seat, put on some tunes, and let your EV take charge!
Monitor the charger and battery closely while charging
As you start the charger during the charging process, it’s important to keep an eye on both the charger and the battery to ensure your device is getting an appropriate charge. It’s recommended to monitor the charger’s indicator light or digital display to see how much power is being delivered to your device. If the light turns red or the display shows the battery is getting too hot, stop charging immediately.
Similarly, keep an eye on the device’s battery level to avoid overcharging. Overcharging can damage your battery’s cells and shorten its lifespan. Therefore, it’s best to keep an eye on both the charger and battery while the device is charging to avoid any risks.
By doing so, you’ll be able to keep your device in top shape for years to come, without having to worry about damaging its battery. Remember, only a properly charged battery can function effectively, so make sure to follow these tips to keep your device running smoothly.
Step 5: Disconnect the Charger
Now comes the final step in using a manual car battery charger – disconnecting the charger. But don’t just simply unplug it from the power source! Make sure you turn off the charger first to prevent any damage to your car or the battery. Once the charger is turned off, detach the cables from the battery, starting with the negative (black) cable first, then the positive (red) cable.
Be careful not to touch the clamps together while they are still connected to the battery as this could cause a short circuit and potentially harm you or your car. Finally, carefully store the charger in a safe and dry place until you need to use it again. With these easy steps, you can effectively use a manual car battery charger to extend the life of your battery and keep your car running smoothly for years to come!
Turn off the charger and unplug it from the power source
When you’ve finished charging your device, it’s important to remember to disconnect the charger properly. The first step is to turn off the charger and unplug it from the power source. This is not only a safety precaution but also helps to conserve energy and reduce your electricity bill.
Leaving the charger plugged in even when it’s not in use can result in what’s known as “phantom power,” where it continues to draw power even when it’s not charging anything. Over time, this can add up to a significant amount of wasted energy and money. By disconnecting the charger when you’re done using it, you’ll be doing your part to reduce your carbon footprint and save on your electricity bill.
So, always remember to turn off your charger and unplug it from the power source when you’re finished charging your device.
Remove the charger cables from the battery terminals
Once you have charged your battery and it’s all ready to go, it’s crucial to remember to disconnect the charger before driving. Step 5 is all about removing the charger cables from the battery terminals. This part can be a bit tricky, so it’s essential to pay close attention.
First, make sure your car is turned off completely before starting. Then, locate the charger cables that are connected to your battery. These cables are usually red and black, with the red cable connected to the positive terminal and the black cable connected to the negative terminal.
Once you have located the cables, carefully remove them from the battery terminals. Remember to take the red cable off first and then the black one. It’s important to note that you should never touch both cables at once or let them touch each other, as this can cause a short circuit or electrical shock.
By following these steps, you are preserving the life of your battery and ensuring that your vehicle runs smoothly the next time you need it.
Conclusion
In the grand scheme of things, learning how to use a manual car battery charger is like learning a new language. You may stumble and fumble at first, but with practice and patience, you’ll soon be fluent in the art of jumpstarting your engine. So, grab those cables, connect them with care, and before you know it, you and your car will be recharged and ready to hit the road once again!”
FAQs
What is a manual car battery charger?
A manual car battery charger is a device that uses electric current to recharge a discharged lead-acid battery.
How does a manual car battery charger work?
A manual car battery charger works by converting AC voltage from a wall outlet into a DC voltage that is suitable for charging a car battery.
How to connect a manual car battery charger to a battery?
To connect a manual car battery charger to a battery, first make sure the charger is turned off, then connect the positive (red) cable to the positive terminal on the battery and the negative (black) cable to the negative terminal on the battery.
How long does it take to charge a car battery with a manual charger?
The amount of time it takes to charge a car battery with a manual charger varies depending on the battery’s capacity and the charger’s output. Typically, it can take anywhere from several hours to overnight to fully charge a car battery.
Can a manual car battery charger overcharge a battery?
Yes, a manual car battery charger can overcharge a battery if it is left connected for too long or set to a higher current than the battery can handle.
Can a manual car battery charger be used to jumpstart a car?
No, a manual car battery charger cannot be used to jumpstart a car. A jump starter or jumper cables are required to jumpstart a car.
What safety precautions should I take when using a manual car battery charger?
When using a manual car battery charger, always wear protective gear such as gloves and eye protection. Make sure the charger is turned off before connecting it to a battery. Also, ensure that the charger and battery are placed on a stable surface.
