Have you ever found yourself standing in the hardware aisle, staring at rows of screws, unsure which size to choose for your 3/4 inch plywood project? It’s a common dilemma faced by both professionals and DIY enthusiasts alike. Choosing the wrong size screw can lead to weak joints, splitting wood, and ultimately, a failed project. But fear not, we’re here to help you navigate the world of screws and find the perfect size for your specific project.
In this comprehensive guide, we’ll walk you through everything you need to know about choosing the right size screw for 3/4 inch plywood, from the different types of screws available, to their lengths and gauges, and much more. So let’s dive in and get screw savvy!
Understanding Plywood Thickness
If you’re working with 3/4 inch plywood, it’s important to choose the right size screw for your project. Using the wrong size can lead to a weakened structure, or even splitting the wood. In general, a #8 or #10 screw is appropriate for most applications with 3/4 inch plywood.
It’s also a good idea to use screws that are at least 1 1/2 times the thickness of the plywood, to ensure a secure hold. Remember, choosing the right size screw is just as important as the quality of the plywood itself, so take your time and do your research before starting your project.
Measuring Plywood Thickness
When it comes to plywood thickness, it can be confusing to understand what you’re getting. Plywood is typically sold in 4’x8′ sheets, but the thickness can vary depending on the type and quality of the plywood. The most common thicknesses you’ll find are 1/4″, 1/2″, and 3/4″, but other thicknesses are available.
It’s important to know the thickness of the plywood you’re using as it affects the strength and stability of the finished product. One way to measure plywood thickness is to use a caliper, which can accurately measure even the thinnest of plywood. Another method is to use a tape measure, which is less precise but still effective.
If you’re unsure about the thickness of your plywood, consult with a professional before starting your project. Understanding plywood thickness is key to creating a well-crafted and sturdy final product that will last for years to come.

Choosing the Right Screw Size
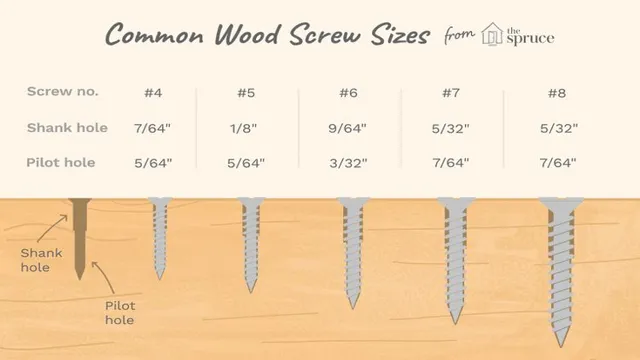
Looking for the right screw size can be challenging, especially when dealing with 3/4 inch plywood. In general, it’s recommended to use screws that are 1-1/4 inch to 1-1/2 inch long for interior applications and 2-1/2 inch long for exterior applications. When it comes to the gauge, #8 or #10 screws are a good fit for 3/4 inch plywood.
It’s important to choose the right size because screws that are too short won’t provide enough holding power and screws that are too long can damage the plywood. Additionally, choosing the right screw size can help prevent the plywood from splitting or cracking during installation. Take the time to find the appropriate screw size to ensure a secure and long-lasting installation on your 3/4 inch plywood.
Consider the Plywood Type
When it comes to choosing the right screw size for your plywood projects, it’s important to consider the type of plywood you’re working with. Different types of plywood require different screw sizes because of their varying thicknesses and densities. In general, thicker plywood requires longer screws to ensure a secure hold.
You also want to consider the diameter of the screws. It’s important to choose a screw diameter that matches the thickness of your plywood to avoid splitting or damaging the wood. Another important factor to consider is the thread count.
Plywood with a high thread count requires a coarse screw while a low thread count plywood requires a fine screw. By taking these factors into consideration, you can choose the right screw size for your plywood project and ensure a successful outcome.
Determine the Screw Length Needed
When it comes to choosing the right screw size, determining the screw length needed is crucial. Using the wrong length can result in the screw not being able to hold the weight or even damaging the surface it’s attached to. To determine the correct length, first decide the material of the surface the screw will be attached to and the material of the screw.
If attaching two pieces of wood, for example, use a screw that is at least two and a half times the thickness of the wood. It’s also crucial to account for any extra length needed for the screw to penetrate both materials fully. If in doubt, it’s always better to choose a slightly longer screw rather than one that’s too short.
By following these tips, you can ensure that you choose the right screw size for your project and avoid any mishaps in the future.
Select the Screw Gauge
Choosing the right screw size is crucial when it comes to construction projects. One of the most important things to consider is the screw gauge. The screw gauge is the measurement of the screw’s thickness, with higher numbers indicating a thicker screw.
It’s important to choose the right screw gauge to ensure a secure and long-lasting hold. Using a screw that’s too small for the job can lead to instability and potential damage to the project. On the other hand, using a screw that’s too thick can cause the material to crack or split.
It’s best to consult a screw size chart to determine the appropriate gauge for the project at hand. Remember, choosing the right screw size is essential for a successful construction project.
Using the Screw Properly
If you’re wondering what size screw to use for 3/4 plywood, it’s important to understand that the appropriate screw will depend on a few factors. First, consider the thickness and type of the material you’ll be screwing the plywood into. Thicker materials will require longer screws, while softer materials may require shorter screws.
In general, a #8 or #10 screw that is 1-1/4 inches long will work well for most 3/4 plywood projects. However, if you’re attaching the plywood to a thicker base, you may need a longer screw. Additionally, it’s crucial to select screws with the appropriate head type and thread pattern.
A coarse thread, for example, is ideal for plywood, as it will grip the material more securely than a fine thread. Ultimately, it’s worth taking the time to select the right size and type of screw for your specific application to ensure a secure, long-lasting installation.
Pre-Drilling Holes
When it comes to screwing in a screw, pre-drilling holes is a crucial step that many people often overlook. Skipping this step can cause the wood to split or the screw to break, making it more difficult to achieve the desired results. To use screws properly, you need to first consider the thickness of the material you are screwing into.
If the material is thin, a smaller screw or a larger hole may be necessary. On the other hand, thicker materials may require a larger screw or pre-drilled hole to ensure a secure hold. By pre-drilling holes, you’re reducing the likelihood of the wood splitting while also making it easier to insert the screw.
Remember, taking the time to pre-drill may take a few extra minutes, but doing it right can save you a lot of time and frustration in the long run.
Inserting the Screw
One of the most important steps in any DIY project that involves woodworking is inserting screws. However, it’s not as simple as just grabbing a screw and attaching it to your project. To use a screw properly, first, you need to choose the right size.
Screws come in different sizes and selecting the right one is crucial to ensure the strength and durability of the finished project. Then, drill the pilot hole with a drill bit slightly smaller than the screw diameter. This will prevent the wood from splitting and make the screw driving easier.
Before driving the screw into the pilot hole, it’s essential to countersink the hole so that the screw head sits flush with the surface of the wood. Using a countersink bit, make a cone-shaped indentation in the wood to ensure the screw head will not protrude above the surface. Finally, insert the screw into the pilot hole and turn it clockwise with a screwdriver or drill until it’s tight.
Don’t overtighten the screw as it may strip the wood or break the screw head. By following these steps, you can easily and securely attach screws to your woodworking projects, ensuring that they will last for a long time.
Conclusion
After much screwing around, we’ve determined that the appropriate size screw for 3/4 plywood is dependent on various factors including the thickness of the material being fastened to and the purpose of the screw. So, before you get screwed over by using the wrong size screw, make sure to do your research and choose wisely. Trust us, it’s screw-iously important!”
FAQs
1. What is the thickness of 3/4 plywood?
3/4 inch or 0.75 inches.
2. Can I use a regular screw for 3/4 plywood?
It is recommended to use a screw with a minimum length of 1 1/2 inches for 3/4 plywood.
3. What type of screw should I use for 3/4 plywood?
It is recommended to use a coarse-threaded screw with a pan or flat head for 3/4 plywood, such as a wood screw or deck screw.
4. Do I need to pre-drill holes for screws in 3/4 plywood?
It is recommended to pre-drill holes for screws in 3/4 plywood to prevent the wood from splitting.
5. How many screws should I use for 3/4 plywood?
It is recommended to use at least 3 screws per support, spaced evenly along the length of the plywood.
6. Can I use a nail gun to attach 3/4 plywood?
Yes, a nail gun can be used to attach 3/4 plywood, but screws are generally recommended for a more secure hold.
7. What is the recommended screw size for 3/4 plywood?
A #8 or #10 sized screw is recommended for 3/4 plywood, depending on the weight load and type of application.


