How to Use Makita Orbital Sander Like a Pro: A Comprehensive Guide.

As a DIY enthusiast, you know the importance of having the right tools for your projects. And if you’re a fan of woodworking, then you definitely need a good quality orbital sander in your collection. One of the most reliable brands out there is Makita.
But how do you use your Makita orbital sander to achieve the best results? Whether you’re a beginner or a pro in woodworking, using an orbital sander can be a bit tricky. But don’t worry, we’ve got you covered. In this blog, we’ll give you some tips and tricks to get the most out of your Makita orbital sander, so you can achieve smooth, polished surfaces on your projects.
From choosing the right sandpaper grit to proper sanding techniques, you’ll learn it all. So, grab your Makita orbital sander and let’s get started!
Safety First
When it comes to using a Makita orbital sander, safety should always be your top priority. Before even turning the tool on, make sure you’re wearing protective gear like goggles, a dust mask, and earplugs. It’s also important to make sure the area you’re working in is well-ventilated and free of any tripping hazards.
As you start sanding, keep both hands on the tool at all times, and never force it into the material you’re working on. Instead, let the sander do the work for you and move it in a circular or back-and-forth motion. And be sure to periodically check the sandpaper and replace it as needed to avoid any accidents.
By taking these precautions, you can safely and effectively use your Makita orbital sander to complete your sanding project with confidence.
Prepare Your Sander
When preparing your sander, safety should always come first. One of the most important things to do is to read the instruction manual for your specific model to familiarize yourself with its operating procedures. Additionally, make sure to wear protective gear, such as safety goggles and earplugs, to prevent any harm from dust, debris, or excessive noise.
Always unplug your sander before making any adjustments or changing the abrasive pads. Lastly, ensure that the sander is properly grounded to prevent electrical shock. By taking the necessary precautions, you can ensure that you have a safe and successful sanding experience.

Start Sanding
If you’re wondering how to use a Makita orbital sander, the first step is to prepare the surface you want to sand. This means removing any debris, loose paint or varnish, and smoothing out any rough edges. Once your surface is prepped, it’s time to get your Makita sander ready.
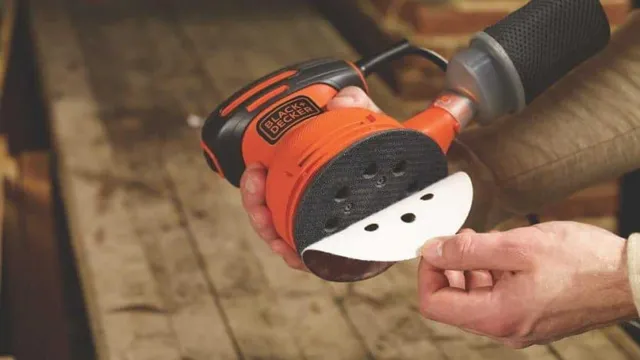
Begin by fitting a sanding disc onto your sander’s velcro pad. Make sure it’s securely attached, but not too tight. Once your disc is in place, you can turn on your sander and start sanding.
The key to using an orbital sander is to move the sander in a circular motion, avoiding any one spot for too long. This will help you achieve an even sanding result and prevent damage to your surface. Always keep the sander moving while it’s on and use light pressure to avoid removing too much material.
With a bit of practice, you’ll be able to achieve a smooth, even result on your sanded surface.
Choose the Right Sandpaper
When it comes to sanding, choosing the right sandpaper is crucial. Different projects will require different types of sandpaper, depending on their materials and the level of roughness needed. Start by checking the grit number, which refers to the coarseness of the sandpaper.
The lower the number, the coarser the grit. A coarser grit is effective in removing heavy layers of material, while a finer grit is needed for a smoother finish. It’s also important to consider the type of sandpaper, such as aluminum oxide or silicon carbide, which will affect the durability and quality of the finished product.
Overall, taking the time to choose the right sandpaper for your project will save time and effort in the long run.
Hold Your Sander Correctly
When beginning your sanding project, it’s crucial to hold your sander correctly to ensure successful results. To start sanding, first, choose the appropriate tool for the job, whether it be a belt sander, orbital sander, or palm sander. Once you have your sander in hand, grip it firmly with both hands, keeping your fingers away from the sanding pad.
Make sure your posture is upright and balanced, and avoid leaning too heavily on the sander. It’s essential to move the sander deliberately and steadily, avoiding rapid or erratic movements that can lead to uneven sanding. Remember, the goal is to sand as evenly as possible, so take your time and apply consistent pressure to achieve the desired level of smoothness.
With a little practice and attention to detail, you’ll soon be sanding like a pro!
Maintaining Your Makita Orbital Sander
Maintaining your Makita orbital sander is essential in ensuring its longevity and optimal performance. Here’s how to use your Makita orbital sander to get the best results out of it. After each use, make sure to clean off any sawdust or debris from the sander’s exterior and interior parts.
Frequent cleaning prevents build-up and prevents the sander from malfunctioning. Additionally, check the sandpaper’s condition before each use and replace it when necessary. Sandpaper that is slashed or torn will not work effectively, so replacing it occasionally is key to ensuring your sander’s longevity.
Finally, be gentle when using the sander and avoid pressing down too forcefully, as this can cause damage to both the sander and the surface being sanded. With these tips, you can use and maintain your Makita orbital sander for years to come!
Cleaning Your Sander
Maintaining your Makita Orbital Sander is crucial if you want it to last long and perform well. One of the most important tasks you can do is to clean your sander regularly. Cleaning removes the dust and debris that accumulate on the sander during use.
Start by unplugging your sander and wiping it with a soft, dry cloth to get rid of any loose debris and dust. Be careful not to use any liquids that can damage your sander. Next, remove the sanding pad and brush it off to get rid of any debris or buildup.
Check the holes in the pad, as they tend to accumulate dust and debris, which can affect the sander’s performance. Finally, clean the dust collection bag or canister, empty it and check if it needs to be replaced. Cleaning your sander regularly can extend its life span and keep it in top performance.
Replacing the Sandpaper
Maintaining the Makita orbital sander is crucial to ensure its longevity and efficient performance. One of the essential steps in keeping it running smoothly is replacing the sandpaper regularly. The process is simple and can be done in a few minutes.
First, remove the old sandpaper by unlatching the sanding sheet and pulling it out. Then, choose the appropriate grit sandpaper and line it up with the base. Next, flip the sander over, wrap the sandpaper around the base, and clip it into place.
Make sure the sandpaper is taut and not wrinkled or folded. Properly fitting and securing the sandpaper guarantees even sanding and prevents damage to the base. With this simple task, your Makita orbital sander will continue to provide top-notch sanding for all your projects.
Conclusion
Congratulations! With the Makita orbital sander, you now have the power to transform any rough surface into a smooth masterpiece. So, dust off your sanding skills and let this powerful tool do the heavy lifting. Remember to always wear safety gear and move the sander in a straight and consistent motion.
And for those hard-to-reach areas, don’t be afraid to switch to the small base or the triangular attachment. Sanding has never been so fun and effortless! Cheers to creating beautiful surfaces effortlessly with the Makita orbital sander. “
FAQs
What is an orbital sander?
An orbital sander is a power tool used to sand wood and other materials in a circular motion.
How do I use a Makita orbital sander?
To use the Makita orbital sander, first, attach the sandpaper to the base of the sander, then turn it on and move it back and forth across the surface you want to sand.
What type of sandpaper should I use with my Makita orbital sander?
The type of sandpaper you use with your Makita orbital sander will depend on the material you are sanding. Generally, a coarser grit should be used for rough surfaces, while a finer grit is better for smooth finishes.
How often should I change the sandpaper on my Makita orbital sander?
It’s best to change the sandpaper on your Makita orbital sander after it becomes worn or damaged. If you’re working on a large project, you may want to change the sandpaper every hour or so to ensure efficient sanding.
What safety precautions should I take when using a Makita orbital sander?
Some safety precautions to take when using a Makita orbital sander include wearing eye and ear protection, using a dust mask, and keeping your hands and fingers away from the sanding surface.
How do I clean my Makita orbital sander?
To clean your Makita orbital sander, first unplug it from the power source. Then, use a soft-bristled brush or compressed air to remove any dust or debris from the sander. You can also wipe it down with a cloth and mild soap and water.
Can I use a Makita orbital sander on metal surfaces?
No, it’s not recommended to use a Makita orbital sander on metal surfaces. This type of sander is designed for use on wood and other soft materials and may damage metal surfaces.


