Are you tired of relying on gas station compressors for inflating your tires? Do you frequently find yourself in remote areas with deflated tires and no access to a compressor? Don’t worry, installing an air compressor on your truck is easier than you think, and we’re here to guide you through it. Having an air compressor on your truck can be a game-changer, especially for off-road enthusiasts and those who frequently tow or haul heavy loads. With an air compressor on board, you can inflate tires, power air tools, and even run air horns.
But before you start drilling holes in your truck, you should have a solid plan and the necessary tools and equipment. In this step-by-step guide, we’ll walk you through the process of installing an air compressor on your truck, from selecting the right compressor to wiring it up and testing it out. We highly recommend that you read through the entire guide before starting the installation process.
So, buckle up and get ready to hop under the hood of your truck. We’ll show you how to install an air compressor that will make your adventures smoother and hassle-free.
Gather the Necessary Tools and Materials
When it comes to installing an air compressor on your truck, the first step is to gather all the necessary tools and materials. You will need a few key items, including an air compressor kit, mounting brackets, bolts and screws, electrical wiring and connectors, and a pneumatic hose. It’s also important to have a wrench set, sockets and ratchets, and a drill with various bits.
Before beginning the installation process, make sure to read through the kit instructions thoroughly and ensure you have all the necessary parts. Installing an air compressor can add a lot of value to your truck, especially if you frequently use air-powered tools or need to inflate tires on the go. With the right tools and equipment on hand, the installation process can be relatively painless and straightforward.
List of tools
Gathering the necessary tools and materials is the first step in any DIY project. Having everything you need on hand will not only save time but also ensure that you have the resources needed to complete the job. Depending on the task at hand, you may need basic hand tools such as a hammer, screwdrivers, pliers, and wrenches.
For larger projects, power tools, such as a drill or saw, might be required. It’s also important to have measuring tools such as a tape measure, level, or square to ensure accuracy. Materials needed will vary depending on the project, but they may include nails, screws, wood, paint, and glue.
Before starting any project, be sure to create a list of necessary tools and materials to avoid any last-minute trips to the hardware store. With the right tools and materials, you’ll be prepared to tackle any DIY project that comes your way!
Materials needed
To get started on your next project, you’ll need to gather all the necessary tools and materials. Depending on the project, this could include anything from hammers and nails to paint and brushes. Make a list of everything you need before you begin, so you know exactly what to look for.
You might also want to do some research to find out what brands or types of materials work best for your specific project. For example, if you’re building a piece of furniture, you’ll want to choose a type of wood that’s strong and durable. If you’re painting a room, you’ll want to choose a paint color that complements your decor.
Once you have everything you need, you’ll be able to dive right in and start creating!
Locate and Mount the Air Compressor
If you’re looking to add an air compressor to your truck, there are a few key factors to consider. First, you’ll need to locate and mount the air compressor, which can be a bit of a process. Start by determining where you want to install the compressor – it should be in a secure location that won’t impede your ability to drive the truck.
Next, you’ll need to mount the compressor, which typically involves drilling holes in the truck bed or frame and attaching the compressor using bolts and brackets. It’s important to make sure the compressor is securely mounted and won’t shift or vibrate while you’re driving. Once you’ve installed the compressor, you can begin connecting it to your truck’s electrical and air systems.
This may involve running wires and hoses, so it’s important to follow the manufacturer’s instructions carefully. With a bit of patience and some basic DIY skills, you can add an air compressor to your truck and enjoy all the benefits it provides.
Choose a suitable location
When it comes to setting up your air compressor, one of the most crucial steps is choosing a suitable location. It’s important to select a spot that is well-ventilated and dry, as the compressor generates heat and moisture during operation. If possible, choose a location that is level and stable, as this will ensure the compressor operates smoothly and minimizes the risk of vibration.
Additionally, make sure there is enough space around the compressor for easy access for maintenance and repairs. It’s also important to consider the noise level of the compressor when selecting a location – look for an area that is far away from areas where people may be working or sleeping. Taking the time to carefully choose a suitable location for your air compressor will ensure it operates safely and efficiently.
Mounting the compressor
If you’ve recently purchased an air compressor, one of the first steps in getting it up and running is mounting it. The first thing you’ll want to do is locate a suitable area that is both sturdy and level to mount your compressor. You want to ensure that your compressor is stable and will not move around during operation.
Once you’ve found the perfect spot, it’s time to begin mounting your compressor. You’ll want to use heavy-duty bolts or screws to mount the compressor securely to the designated area. Make sure that you read and follow the manufacturer’s instructions carefully when installing your air compressor.
Additionally, you may want to consider using vibration isolator pads to reduce noise and prevent unnecessary wear and tear on your compressor. By following these simple steps, you’ll be able to locate and mount your air compressor with ease.
Install Necessary Hoses and Fittings
So, you’re looking to install an air compressor on your truck and you’re wondering how to go about it. One of the first steps you’ll need to take is to install the necessary hoses and fittings for your compressor. This step is crucial as it ensures that your compressor is properly connected to all the other components and systems that it needs to work efficiently.
To start, you’ll want to decide where on your truck you want to mount the compressor. Once you’ve figured that out, you can then begin to attach the hoses and fittings from the compressor to the rest of the system. Be sure to use high-quality hoses and fittings that are rated for the pressure and flow rate that your compressor requires.
This will ensure that your compressor works effectively and safely over time. With the right hoses and fittings in place, you’ll be one step closer to having a reliable air compressor on your truck that you can use for a variety of tasks, from inflating tires to powering tools and equipment.
Select the right type of hoses and fittings
When it comes to installing necessary hoses and fittings, selecting the right type is crucial. Different types of hoses and fittings are designed for specific functions, and using the wrong combination could lead to leaks, weak hose connections, or even damage to equipment. Therefore, it is essential to ensure that you choose the right hoses and fittings for your specific application.
For instance, if you are working with hydraulic systems, you need to select hoses and fittings that can handle high-pressure fluids. On the other hand, for low-pressure applications like air compressors or water supply, different types of hoses and fittings should be used. Choosing the wrong hose or fitting could cause it to burst or rupture, leading to catastrophic consequences.
Always consult with an expert or manufacturer’s recommendations to determine the best hose and fitting type for a specific application. By doing so, you can avoid costly repairs, downtime, or injuries that could have been avoided by just using the right equipment.
Connect hoses and fittings to the compressor
When it comes to connecting hoses and fittings to your compressor, it’s essential to have the necessary components for proper installation. You don’t want to end up with leaks or other issues because of poor fittings or hoses. Start by checking the manual or manufacturer’s website to determine which fittings are compatible with your compressor.
Next, gather the hoses, fittings, and any adaptors needed for each connection. It’s important to tighten all fittings securely to prevent air leaks. Consider using Teflon tape on any threaded connections to ensure a tight seal and avoid any loose fittings creating an air leak.
Remember, having the right hoses and fittings installed properly can make all the difference in the performance of your compressor.
Connect the Compressor to the Power Source
So, you’re ready to install an air compressor on your truck and you want to make sure you do it correctly. One of the first steps in the process is connecting the compressor to a power source. This can be done by using a power cable that runs from the compressor to the battery.
It’s important to make sure the cable is long enough to reach the battery and that it’s made of high-quality materials to ensure a safe and secure electrical connection. Once the cable is connected, you can test the compressor to make sure it’s working properly before moving on to the next step of the installation process. With a little bit of effort and attention to detail, you can have your air compressor up and running in no time, making your truck all the more versatile and useful on the road.
Wiring the compressor to the battery
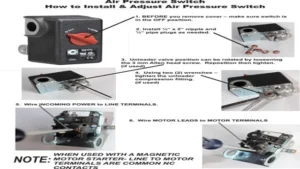
When you’re wiring your compressor to the battery, it’s important to remember that safety should always come first. Before you start, make sure that your compressor has been properly grounded and that there are no loose connections. Once you’re sure everything is secure, you can begin the wiring process.
The first step is to connect the positive battery cable to the positive terminal on your compressor. Next, connect the negative battery cable to the negative terminal on your compressor. Once your compressor is connected to the battery, you should test it to make sure it’s working properly.
Just keep in mind that this is an electrical device, so it can be dangerous if it’s not installed correctly. If you’re not confident in your abilities, it’s always better to get a professional to do it for you.
Safety precautions when connecting power
When connecting your compressor to a power source, safety precautions are crucial. Firstly, always make sure that the compressor is turned off before connecting it to the power supply. Also, take note of the maximum voltage and amperage that your compressor requires, and ensure that the outlet you are using can handle this.
It’s important to use a grounded plug and outlet, as well as a heavy-duty extension cord if needed. Additionally, make sure the power cord is free from any damage before plugging it in. Remember, electricity can be dangerous, so it’s important to be cautious and take the necessary precautions to prevent accidents.
Don’t take any shortcuts and always prioritize safety when connecting your compressor to the power source.
Test the Air Compressor
If you want to install an air compressor on your truck, the first thing you need to do is test it. Testing the air compressor before installation ensures that it is in good working condition and can handle the pressure required for your truck. You can test the air compressor by attaching it to a power source and running it for a few minutes.
If the compressor runs smoothly and produces enough pressure, then it is good to go. However, if you notice any unusual noises or the pressure is not enough, then you may need to repair or replace the air compressor before installation. Remember that a faulty air compressor can cause serious damage to your truck’s engine, so it’s crucial to test it thoroughly before installing it.
So, before installing that air compressor on your truck, make sure you test it thoroughly to avoid any unforeseen issues down the road.
Running a test
If you’re planning on using an air compressor, you want to make sure it’s safe and functional before you start. Running a test is essential for this reason. Testing the air compressor involves some straightforward steps that you can do with ease.
First, check to see if the compressor is properly connected to an electrical power source. Next, add some oil to the air compressor pump to lubricate it. Afterward, switch on the air compressor and let it run for a short period to confirm that there are no gas leaks or other issues.
During the test, listen for any unusual sounds coming from the compressor, which could indicate problems. A well-tuned, well-maintained air compressor should run smoothly. Keep an eye on the gauges as the compressor is running to check for the proper pressure levels and to make sure the safety valve activates if necessary.
By following these simple steps, you can ensure that your air compressor is ready to handle any job you need it for.
Troubleshooting common issues
When it comes to troubleshooting common issues with your air compressor, one of the first things you should do is test the compressor itself to see if it’s operating correctly. A common issue with air compressors is that they might not turn on or produce any compressed air. If this is the case, there are a few things you can do to test the compressor to see what the issue might be.
First, make sure that the power supply to the compressor is working properly. If the compressor is plugged in and receiving power, you should be able to hear it turn on when you flip the power switch. If it doesn’t turn on, you might need to check the switch or the wiring to make sure everything is connected correctly.
You can also check the compressor’s air filter to see if it’s clogged, which could be preventing the compressor from functioning properly. By testing these basic components of the air compressor, you can quickly diagnose any issues and get your compressor back up and running in no time.
Conclusion
Congratulations! You have now successfully learned how to be an air compressor installation wizard! With your newfound skills, you can inflate your tires, power your tools, and turn any job into a breeze. Remember, the key to a smooth installation is preparation, patience, and a little bit of elbow grease. So go forth, my DIY friend, and conquer the road with your trusty air compressor at your side.
And who knows, maybe you’ll even start your own mobile tire repair business! Now that’s what we call a DIY success story.”
FAQs
What are the necessary tools required to install an air compressor on my truck?
The necessary tools required to install an air compressor on your truck include a drill, wrenches, air lines, fittings, and mounting brackets.
Do I need any electrical wiring for my air compressor installation?
Yes, you will need to wire a switch between your battery and the compressor unit, so that you can easily turn the compressor on/off when required.
Where is the ideal location to mount my air compressor on my truck?
The ideal location to mount your air compressor will depend on the type and size of your compressor, as well as the space availability on your truck. Mounting the compressor behind the driver seat or on the frame rail is pretty common.
What is the recommended size of air compressor for my truck?
The recommended size of air compressor for your truck will depend on the purpose of using the compressor. If you plan to use it for simple tasks like filling up tires, a small portable compressor can do the job. However, if you are planning to use it for heavy duty applications like air tools, then a larger stationary compressor with high CFM output would be required.
What maintenance is required for my air compressor after installation?
Regular maintenance like checking the oil level, air filter, and belts is necessary to maintain the proper functioning of the air compressor. Also, it’s necessary to check the drain valve, pressure switch, and safety relief valve for any leaks or damages periodically.
Is it necessary to use an air tank with my compressor installation?
Using an air tank is optional, but it can bring many advantages like increasing the air storage capacity, reducing the load on the compressor, and providing a stable pressure output for continuous usage.
Can I use my air compressor to power up other accessories on my truck?
Yes, you can use your air compressor to power up other accessories on your truck like air horns, air suspension, power tools, air bags, train horns, and other pneumatic equipment.


